


Getting Started With the OpenAI API: A Beginner's Guide
The OpenAI API is a powerful tool for integrating AI into your projects. It allows you to perform tasks like text generation, coding, image analysis, and audio transcription. With three model options - GPT-5.4, GPT-5.4-mini, and GPT-5.4-nano - you can balance complexity, speed, and cost. Here's what you'll learn:
- How to set up and authenticate using API keys.
- Making your first API call and selecting the right model.
- Handling errors, managing rate limits, and optimizing costs.
- Practical use cases like chatbots, JSON outputs, and more.
Whether you're a developer or part of a team exploring automation, this guide provides a clear roadmap to get started with OpenAI API and use it effectively. Let’s dive into the details.
OpenAI API Masterclass: Platform, Models & API Explained (Part 1/5)
Understanding the OpenAI API Basics
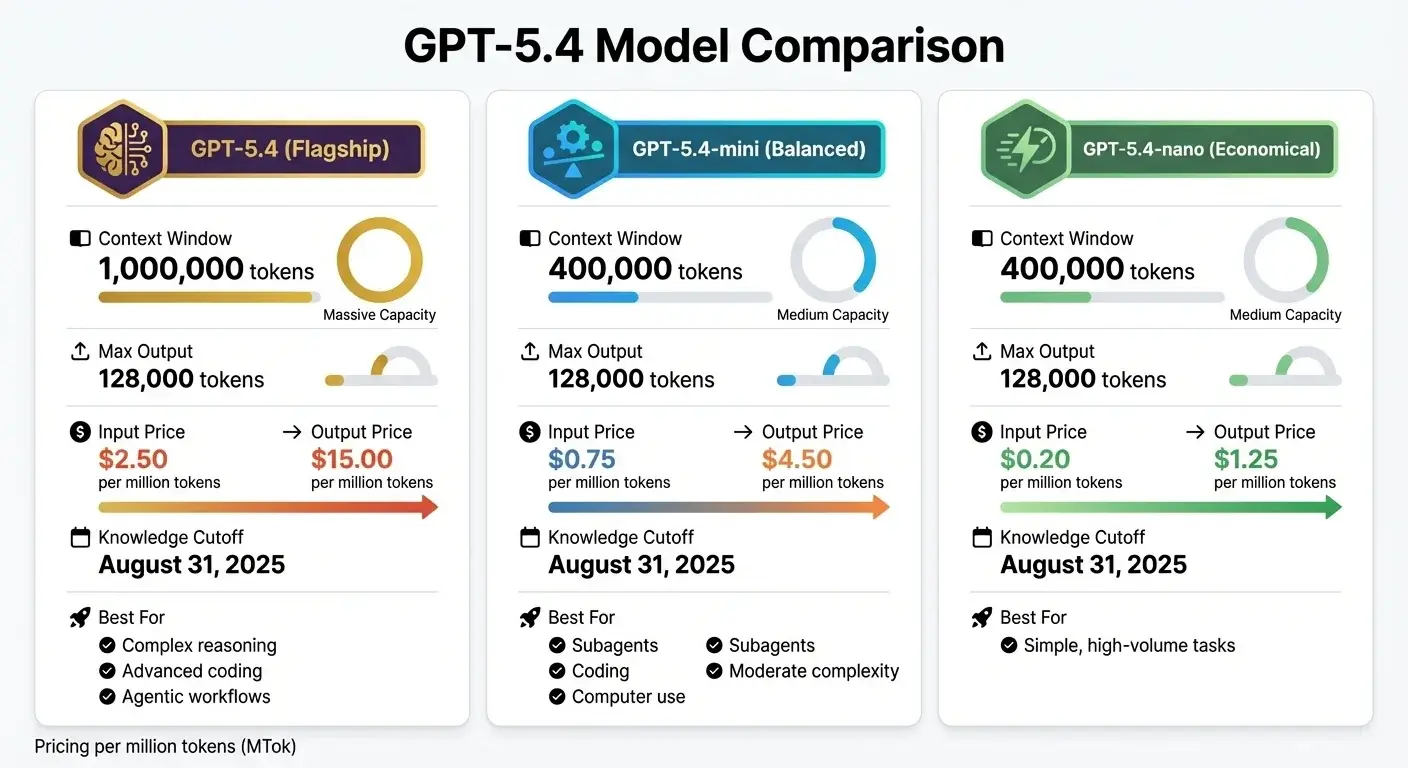
OpenAI GPT-5.4 Model Comparison: Pricing, Context Windows, and Use Cases
The OpenAI API works through a RESTful interface, using standard HTTP requests. You send a request with your instructions (commonly called a "prompt"), and the AI model responds based on those instructions. Think of it as a back-and-forth conversation: you ask questions or assign tasks, and the model delivers answers or completes the tasks. A key part of this process involves understanding how tokens define the limits for input and output.
The API processes text in segments called tokens. On average, one token equals about 4 characters or 0.75 words in English[5]. This is important because every model has a maximum context length, which is the total number of tokens allowed for both input and output combined. If you're handling large documents or need detailed responses, you'll need to stay within these limits.
To secure your API calls, use a Bearer token in the HTTP Authorization header. For smoother integration, OpenAI provides official SDKs for Python, JavaScript, .NET, Java, and Go[1]. When deploying in production, always load API keys from server-side environment variables to maintain security.
Capabilities and Use Cases
The OpenAI API isn't just for generating text. It supports workflows that combine text, images, and audio[3]. For text-based tasks, you can generate content, write code, solve math problems, or create structured JSON outputs that follow specific schemas. On the visual side, it offers image analysis, while audio tools can handle transcription and speech generation.
Developers can expand the API's functionality with features like function calling and external tools. You can define custom functions for the model to execute or use tools like web search and file search to connect with external systems. The Agents SDK allows you to create autonomous agents capable of managing state and performing multi-step tasks without constant human input.
For applications requiring real-time interaction, the Realtime API provides low-latency, multimodal conversations using WebRTC or WebSockets, making it perfect for voice assistants. Additionally, the Structured Outputs feature ensures that responses adhere to a specified JSON schema, making it easier to integrate the data into your application.
One crucial note: OpenAI does not train its models on data submitted through the API, so your inputs and outputs remain private[5].
With these features in mind, let's explore the models available to handle different types of workloads.
Available Models Overview
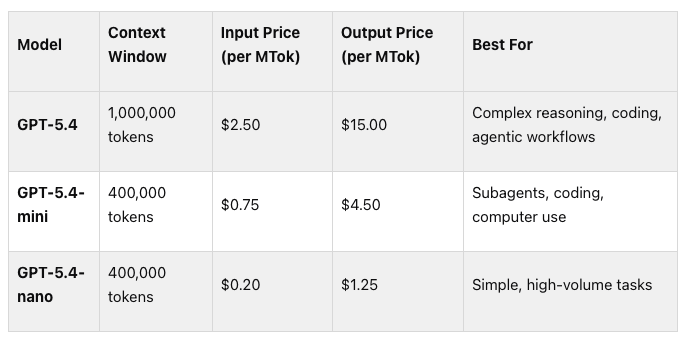
The GPT-5.4 family offers three options tailored to various needs. The flagship GPT-5.4 model is designed for tasks requiring advanced reasoning, complex coding, and professional workflows. It supports a massive 1,000,000-token context window, a maximum output of 128,000 tokens, and has a knowledge cutoff of August 31, 2025. Pricing is set at $2.50 per million input tokens and $15.00 per million output tokens[7]. This model is ideal for intricate, multi-step tasks where precision is critical.
For tasks that prioritize lower latency and cost efficiency, GPT-5.4-mini is a solid choice. It offers a 400,000-token context window, the same 128,000-token output limit, and is priced at $0.75 per million input tokens and $4.50 per million output tokens[7]. This model strikes a balance between performance and affordability, making it suitable for moderately complex workflows.
If your focus is on high-volume, simple tasks, GPT-5.4-nano provides the most economical option. It also supports a 400,000-token context window and costs just $0.20 per million input tokens and $1.25 per million output tokens[7]. This model is perfect for straightforward operations that require speed and cost-effectiveness.
For new projects, it’s better to use the Responses API instead of the older Chat Completions API, especially when working with reasoning models like GPT-5[4]. The Responses API delivers better performance and smarter outputs. When moving to production, pin specific model snapshots (e.g., "gpt-5-2025-08-07") instead of generic names to ensure consistent results across updates[4].
Setting Up the OpenAI API
Getting and Managing API Keys
To get started, head over to platform.openai.com and sign up. Important: ChatGPT Plus does not include API access. The API operates on a separate billing system[8]. Once you’re in, go to the API dashboard and generate your secret key. Don’t forget to copy it immediately and store it securely, like in a password manager[8].
"Remember that your API key is a secret! Do not share it with others or expose it in any client-side code (browsers, apps)."[1]
Avoid hardcoding your API key directly into your source code or committing it to version control systems like GitHub[8].
Before making API calls, you’ll need to add a payment method in the Billing section of your dashboard. You can use either a credit card or prepaid credits[8]. While you might get a few free test requests initially, production-level applications require credits to access higher rate limits and advanced models[2].
Once your API key is ready and billing is set up, you can move on to configuring your development environment.
Setting Up Your Environment
The best way to handle authentication is by using environment variables. OpenAI's SDKs are designed to automatically detect a system variable called OPENAI_API_KEY[2][6]. Here’s how to set it up:
- macOS or Linux: Add the line export OPENAI_API_KEY="your_api_key_here" to your terminal profile file (like .zshrc or .bash_profile)[6].
- Windows: Use PowerShell to run the command setx OPENAI_API_KEY "your_api_key_here"[6][9].
After setting the environment variable, install the SDK for your preferred programming language:
Finally, test your setup by making a simple API call to ensure your key is active and billing is properly configured[8].
Note: If you’re working behind a corporate firewall, ensure that api.openai.com is whitelisted and accessible on port 443[9].
Making Your First API Request
Building a Simple API Call
Once your API keys are set and your environment is ready, you can start interacting with the OpenAI API. The API uses HTTP Bearer authentication, meaning your API key must be included in the authorization header as Authorization: Bearer OPENAI_API_KEY [11]. If you're using the SDKs, they automatically pull your API key from the environment variable.
Every API request requires two key elements: the model you want to use (e.g., gpt-5.4, which is the latest as of April 2026 [10]) and the input text that specifies what you want the model to do.
Here’s a simple example in Python using the Responses API, which is the preferred interface for new text generation tasks:
from openai import OpenAI

client = OpenAI()

response = client.responses.create(
    model="gpt-5.4",
    input="Generate a welcome message for a developer learning the OpenAI API."
)

print(response.output_text)
To troubleshoot issues like latency or errors, keep an eye on the x-request-id and openai-processing-ms headers [11]. These headers can provide valuable insights into what might be causing delays or problems with your requests.
Once you've sent your first request, the next step is to understand how to interpret the API's responses so you can effectively use the generated content.
Reading API Responses
After making a request, the API's response includes a structured output. The key part of this response is the output array, which contains the generated content. For simpler applications, you can rely on the output_text property, but for more advanced systems, understanding the full structure is essential. Each item in the output array includes:
- id: A unique identifier for the output.
- type: Typically set to 'message.'
- role: Usually 'assistant.'
- content: An array containing the generated text.
The position of text within the output array can vary, especially with advanced models like GPT-5, which may include tool calls or reasoning tokens. To ensure you handle all content types correctly, it’s best to loop through the output array.
For applications needing faster responses, the API supports streaming by setting stream: true in your request. This allows the model to send results as they're generated, improving the perceived response time for users. For consistent performance in production environments, consider pinning your application to a specific model snapshot, such as gpt-5-2025-08-07.
Best Practices for Using the API Efficiently
Selecting the Right Model for Your Task
Choosing the right model is key to getting the most out of the API. Start by focusing on accuracy, not cost. Use a top-tier model like GPT-5.4 to establish a performance baseline. Once you've determined what qualifies as "good enough" - say, 90% correct classification - you can start optimizing for cost [12].
When you're ready to cut costs, consider model distillation. This involves fine-tuning a smaller model, like GPT-5.4 Mini, using the outputs of your larger model [12]. GPT-5.4 Mini can achieve 80–90% of GPT-5.4's quality but at only 20% of the cost [15]. For simpler, high-volume tasks like sentiment analysis or basic data extraction, GPT-5.4-nano offers even greater savings, costing just $0.10 per million input tokens compared to GPT-5.4's $1.25 [15].
Another effective strategy is model routing, where simpler queries are handled by budget models while more complex tasks are directed to flagship models. This method can slash average costs by up to 70% [15]. For tasks involving complex reasoning or multi-step logic, you can pair o-series models as "planners" with GPT models as "doers" to execute straightforward steps [13]. For example, Hebbia found that "o1 yielded stronger results on 52% of complex prompts on dense Credit Agreements compared to other models" [13]. Similarly, Blue J reported "a 4x improvement in end-to-end performance by switching to o1" [13].
These strategies, combined with smart cost-saving measures, can help you maintain both performance and budget efficiency.
Reducing Costs and Improving Performance
After selecting the right model, there are additional ways to save money and boost performance. The Batch API is a great option for asynchronous tasks that don't require immediate responses. It offers a 50% discount on all models for tasks completed within 24 hours [15]. For instance, GPT-5.4's input costs drop from $2.50 to $1.25 per million tokens, and output costs go from $15.00 to $7.50 per million tokens [17]. This is ideal for workloads like overnight data processing or model evaluations.
Prompt caching is another tool to lower expenses. Cached input tokens for GPT-5.4 cost just $0.25 per million - 90% less than the standard $2.50 rate [17]. The API automatically caches repeated system prompts, so structuring your requests to reuse static content can significantly cut costs. Maintaining consistent session histories also helps increase cache hit rates.
Efficient token management is crucial for both cost and speed. Adjust the max_tokens parameter to match your expected response size, as rate limits are based on the maximum value [20]. Reducing output tokens by 50% can cut latency by the same percentage, while trimming prompt size by 50% typically improves latency by only 1–5% [21]. Use stop sequences to avoid unnecessary token generation and keep prompts concise.
Finally, monitor your usage closely. Use response headers like x-ratelimit-remaining-tokens and x-ratelimit-remaining-requests to track your capacity in real time [16]. You can also set up spending alerts in your OpenAI dashboard to receive emails when costs exceed specific thresholds [18]. For production applications, always log the x-request-id header to help troubleshoot latency issues with OpenAI support [14].
Integrating the API Into Your Applications
Building on the earlier setup and best practices, this section focuses on incorporating the API into production-ready applications.
Error Handling and Rate Limiting
Creating a reliable application means anticipating and managing errors effectively. The API enforces limits through five key metrics: Requests Per Minute (RPM), Requests Per Day (RPD), Tokens Per Minute (TPM), Tokens Per Day (TPD), and Images Per Minute (IPM) [16][20]. These limits depend on your account tier. For instance, new accounts start at Tier 1 with a $100 monthly cap, while Tier 5 accounts (those spending $1,000+ monthly with at least 30 days of payment history) can access up to $200,000 per month [16][20].
If you encounter a 429 error, it could mean you've hit a rate limit, depleted your prepaid balance, or the engine is overloaded [23][24]. To handle this, use exponential backoff with jitter - retry failed requests with progressively longer delays (e.g., 1 second, 2 seconds, 4 seconds) and add random variation to avoid synchronized retries [19][16]. Libraries like tenacity and backoff can automate this process.
You can monitor your API usage in real time by checking the x-ratelimit-remaining-requests and x-ratelimit-remaining-tokens headers in API responses. These headers indicate how much capacity remains [16][1]. Additionally, set the max_tokens parameter close to your expected response size, as OpenAI counts the maximum tokens requested - not just the tokens generated - against your TPM limit [16][23]. For long-running requests, such as those using GPT-4 or reasoning models, increase the HTTP timeout to 60+ seconds instead of the default 10–30 seconds [23].
When deploying to production, always log the x-request-id header. OpenAI advises: "OpenAI recommends logging request IDs in production deployments for more efficient troubleshooting with our support team" [1]. This practice can save significant time when diagnosing latency issues or unexpected behaviors.
Once error handling is in place, you can integrate the API into your application using official libraries and structured design patterns.
Practical Integration Examples
The API supports official libraries for several programming languages, including JavaScript (Node.js, Deno, Bun), Python, .NET (C#), Java, and Go [10][2]. For tasks like building a chatbot, keep in mind that the API is stateless. This means it doesn’t retain the context of past interactions - you’ll need to include the entire message history (system, user, and assistant roles) in every request to maintain continuity [25]. Enabling stream: true allows tokens to be returned as they’re generated, improving response times for users [25][22].
For data summarization tasks, you can upload PDF documents and extract key points by combining file search capabilities with vector stores. Keep in mind that vector store ingestion is limited to 300 requests per minute per store ID, so plan batch operations accordingly [20]. If you’re developing language triage agents, the Agents SDK can route requests to specialized sub-agents based on language or task complexity [10][2].
You can also enhance the API’s functionality by integrating tools like web search for live updates, file search for document analysis, or custom function calls to interact with external systems such as weather APIs or internal databases [10]. For large-scale operations like overnight data processing, model evaluations, or bulk content generation, the Batch API offers a cost-effective solution - processing large datasets at 50% lower costs without affecting synchronous rate limits [16][20].
As your application scales, consider horizontal scaling (adding more nodes) or vertical scaling (upgrading existing resources). Use load balancing and cache frequently accessed data to minimize redundant API calls and optimize performance [22].
Conclusion
Key Takeaways
The OpenAI API is open to all developers. To get started, you'll need to securely set your API key and use the official libraries tailored for your tech stack [2][26]. The request structure is straightforward: choose a model like gpt-5.4 and provide your input as either a string or an array of messages [2]. Beyond text generation, the API supports multimodal features, allowing you to analyze image URLs or upload PDFs for tasks like summarization [2][6]. Built-in tools and custom function calls further expand what you can achieve with the API [2][27].
To manage costs effectively, select the right model for your needs and consider batch processing to maintain scalability.
"Mastering prompts, tokens, roles, and costs is what separates AI users from AI engineers" [28].
With these basics covered, you're ready to explore and implement the API in your projects.
Next Steps for Developers
Start by using the Chat Playground to experiment with conversational prompts [2][6]. This interactive tool allows you to see how different models respond to various inputs, helping you refine your approach before committing to a full implementation. When you're ready to scale, check out the Responses API for managing multi-turn interactions, complete with conversation history and hosted tool integration [27].
For more advanced functionality, explore the Agents SDK and Realtime API, which can elevate your application's performance [2][29]. The Agent Builder tool makes it easier to deploy and fine-tune complex workflows [6][26]. Additionally, the OpenAI Cookbook offers practical examples, from integrating web search to handling stateful conversations [27].
To unlock higher rate limits and access advanced models like GPT-5.4, make sure to add credits to your billing account [2][6]. Start small by experimenting with specific use cases and adopt best practices, such as safety checks and optimizing for latency [2][6]. The API's flexibility allows you to begin with simple text tasks and expand into more complex multimodal workflows as your needs evolve. These steps set the foundation for integrating AI into your projects effectively and efficiently.
FAQs
Which model should I start with?
For those just starting out, gpt-3.5 (like "gpt-3.5-turbo") is an excellent choice because it strikes a good balance between performance and affordability. If you're looking for the most up-to-date features, you might opt for gpt-4, though it comes with higher costs and may have specific access requirements. For initial experiments, "gpt-3.5-turbo" is often recommended as it handles a wide range of tasks efficiently.
How do I estimate token usage and cost?
To figure out token usage and costs with the OpenAI API, you can rely on the Usage API. It provides details about input tokens, output tokens, and the number of requests. Once you have the token counts, multiply them by the model's per-token rate (e.g., $0.03 per 1,000 input tokens for GPT-4).
To keep your spending in check, use the Cost API to monitor your expenses regularly. This way, you can stay on budget and avoid any surprise charges.
How can I store chat history securely?
To keep your chat history secure, it's essential to understand OpenAI's data policies. Chats are stored until you manually delete them, and once deleted, they cannot be recovered. These deleted chats are removed from your history and permanently erased within 30 days, unless OpenAI needs to retain them for legal purposes.
OpenAI ensures your data is protected by encrypting it both at rest with AES-256 and during transit using TLS 1.2+. For extra security, you can take steps like configuring retention settings, enabling enterprise authentication, and routinely deleting data that you no longer need.
Looking to scale more efficiently? Connect with iDelsoft.com! We specialize in developing software and AI products, while helping startups and U.S. businesses hire top remote technical talent—at 70% less than the cost of a full-time U.S. hire. Schedule a call to learn more!
19.05.2026
See also
